
Requirements
For this instructables you’ll need several things.
- An android phone or the emulator from android studio
- A raspberry pi (I tried B and 2B)
- An internet connection with port 80 forwarded to the IP of your Raspberry Pi (How to forward port 80?)
- you can do it without forwarding, but then it’s only going to work inside your network
- A computer (I’m running windows 8.1. But ,as mentioned in the comments, you can also use mac or linux)
- Android Studio of course…
- XAMPP or manually install PHP, MySQL, PHPMyAdmin, Apache2
To install apache 2, PHP and MySQL I used this tutorial.
To install PHPmyadmin I used this tutorial.
Creating the Database Using Phpmyadmin
First open a web-browser and go to:
http://YOUR_RPI_IP_ADDRESS/phpmyadmin
- Login to phpmyadmin
- Click Databases
- Create new database and name it: Parts
- Press create.
Open the database Parts.
- Create new table Parts with 3 fields.
- Press Start
First column:
column: ID
Type: INT
Auto increment: v
Second column:
column: Name
Type: VARCHAR
Length: 30
Third column:
column: part_nr
Type: INT
Press Save
Server-Side Scripting with PHP
On the Raspberry Pi we’ll need 4 files. You need to place them in the www directory of your raspberry pi:
UPDATE: On raspbian Jessie, you have to put them in /var/www/html
dp_config.php
<?php // db_config.php define('DB_USER', "user"); // db user define('DB_PASSWORD', "password"); // db password (mention your db password here) define('DB_DATABASE', "db_name"); // database name define('DB_SERVER', "localhost"); // db server ?>
db_connect.php
<?php class DB_CONNECT { // constructor function __construct() { // connecting to database $this->connect(); } // destructor function __destruct() { // closing db connection $this->close(); } function connect() { // import database connection variables require_once __DIR__ . '/db_config.php'; // Connecting to mysql database $con = mysql_connect(DB_SERVER, DB_USER, DB_PASSWORD) or die(mysql_error()); // Selecing database $db = mysql_select_db(DB_DATABASE) or die(mysql_error()) or die(mysql_error()); // returing connection cursor return $con; } function close() { // closing db connection mysql_close(); } } ?>
db_create.php
<?php // array for JSON response $response = array(); // check for required fields if (isset($_POST['Name']) && isset($_POST['part_nr'])) { $Name = $_POST['Name']; $part_nr = $_POST['part_nr']; // include db connect class require_once __DIR__ . '/db_connect.php'; // connecting to db $db = new DB_CONNECT(); // mysql inserting a new row $result = mysql_query("INSERT INTO Parts(Name, part_nr) VALUES('$Name', '$part_nr')"); // check if row inserted or not if ($result) { // successfully inserted into database $response["success"] = 1; $response["message"] = "Part successfully inserted."; // echoing JSON response echo json_encode($response); } else { // failed to insert row $response["success"] = 0; $response["message"] = "Oops! An error occurred."; // echoing JSON response echo json_encode($response); } } else { // required field is missing $response["success"] = 0; $response["message"] = "Required field(s) is missing"; // echoing JSON response echo json_encode($response); } ?>
db_view.php
<?php // array for JSON response $response = array(); // include db connect class require_once __DIR__ . '/db_connect.php'; // connecting to db $db = new DB_CONNECT(); // get all products from products table $result = mysql_query("SELECT *FROM Parts") or die(mysql_error()); // check for empty result if (mysql_num_rows($result) > 0) { // looping through all results // products node $response["Parts"] = array(); while ($row = mysql_fetch_array($result)) { // temp user array $Part = array(); $Part["ID"] = $row["ID"]; $Part["Name"] = $row["Name"]; $Part["part_nr"] = $row["part_nr"]; // push single product into final response array array_push($response["Parts"], $Part); } // success $response["success"] = 1; // echoing JSON response echo json_encode($response); } else { // no products found $response["success"] = 0; $response["message"] = "No parts inserted"; // echo no users JSON echo json_encode($response); } ?>
- The db_config file is used for storing the username, password and database name
- The db_connect file is used to connect to the database specified in the db_config file.
- The db_create file is used to create a row in the table in the connected database.
- The db_view file is used to get all data stored in the database.
Developing the Android Application
In this step I’ll explain how to make a simple app using android studio.
Here we will make the layout of the app and in the next step I’ll explain how to make the app working and how to communicate with the raspberry pi server.
- First open your Android Studio.
- Give your app a name and choose the directory to place it.
- Press Next.
- Choose which devices you would like to support. I’m using phones starting from android 4.0.3.
- After that you need to choose the activity. Choose: “Blank Activity”.
- Let it load and wait…
- After all these steps, you get an example “hello world” app. then
- In activity_main.xml remove the textview element at the right bar.
- In values/strings.xml remove:
Hello world!
- Go back to main_activity.xml
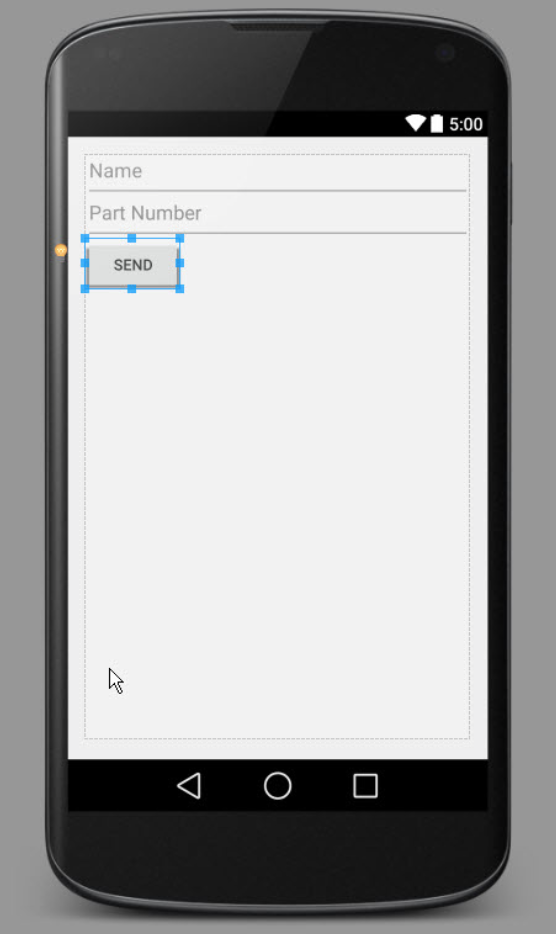
- Drag a linear layout (vertical) to the top left corner of the screen.
- Drag 2 text fields to the screen. The first one plaintext and the other one Number.
- In the properties, scroll down until you see “id”.
- Change this for the first one to Name and for the second one to part_nr.
- Then scroll down untill you see “hint”.
- Change this for the first one to Name and for the second one to Part Number.
- Now drag a button onto the screen and change “text” to Send.
- You can test the app by connecting your phone to your computer and compiling the app. (The green arrow at the top of Android Studio)
It should look something like the image below.
Java Code
First of all, you need to download the attached file.
This file is a library so you can easily use JSON.
Place this file in:
directiory/app_name/app/src/main/java/company/app_name/JSONParser.java
For me it’s:
C:/Users/USERNAME/Desktop/PROJECT_NAME/app/src/main/java/JSONParser.java
After that you can open JSONParser in android studio. You now need to change the first line to:
package company.app_name;
Ok now we can start writing the main code.
Open the file MainActivity.java
First make a new Progress-dialog. This is used to display when the code is executing and you need to wait.
Place this in the main class.
private ProgressDialog pDialog;
Then we need a JSONparser object to send the data. So place this line under the previous line:
JSONParser jsonParser = new JSONParser();
Now we need two EditText items, so we can extrude the inserted text. This goes under the JSONParser.
EditText editText;
EditText editText2;
We move on to the oncreate function. Here we need to link the EditTexts from above with the real edittexts in the layout. You do it like this:
editText = (EditText) findViewById(R.id.Name);
editText2 = (EditText) findViewById(R.id.part_nr);
At the end we need to create a new class for connecting to the server and sending the previous typed info.
This is the class Create_part:
 class Create_Part extends AsyncTask {

 @Override protected void onPreExecute() {
 super.onPreExecute();
 pDialog = new ProgressDialog(MainActivity.this);
 pDialog.setMessage("Sending part to the database..."); //Set the message for the loading window
 pDialog.setIndeterminate(false);
 pDialog.setCancelable(true);
 pDialog.show(); //Place the loading message on the screen
 }

 @Override protected String doInBackground(String... args) {

 String String_name = editText.getText().toString(); //Get the inserted text from the editText files
 String Int_Part = editText2.getText().toString();

 List params = new ArrayList<>();
 params.add(new BasicNameValuePair("Name", String_name)); //Add the parameters to an array
 params.add(new BasicNameValuePair("part_nr", Int_Part));

 // Do the HTTP POST Request with the JSON parameters
 // Change "RaspberryPi_IP to your home IP address or Noip service

 JSONObject json = jsonParser.makeHttpRequest("RaspberryPi_IP/db_create.php", "POST", params);

 try {

 int success = json.getInt("success");
 if(success == 1){
 Intent i = new Intent(getApplicationContext(), ConfirmActivity.class);
 // Open a new activity to confirm it was sent. We're going to create it later.
 startActivity(i);
 finish();

 }
} catch (JSONException e) {

> e.printStackTrace();
 }

 return null;
 }

 protected void onPostExecute(String file_url){

   pDialog.dismiss(); // Close the loading window when ready
   }
}
Now you can make a new function called Send. In this function you call Create_Part. Like so:
public void Send(View view) {
new Create_Part().execute();
}
In the activity_main.xml you now change the onclick action of the button on the right to:
Send
Ok your almost done, now you only need to make a new activity like you see in the image.
Change the activity name to: ConfirmActivity
Click Finish
Now go again to strings.xml and change the “hello_world” string from Hello World! to The part was created.
Now it should be done.
Rebuild the app and test iton your phone!
Java-files.zip (4.7 KB)
If you have questions/remarks please share them and I will see if I can answer them.
Credits: Laurens