
To build your application, you need:
- A Bluemix account
- Familiarity with the Java programming language
- Familiarity with MQTT
- Optionally, familiarity with Node-RED
In general terms, the Bluemix IoT service acts as the MQTT broker, and is thus responsible for distributing messages to connected clients (devices and applications). Devices include machines that publish information they detect, and applications are the programs that consume the information received from those devices. Devices and applications communicate with the MQTT broker using the MQTT protocol.
An app using the Bluemix IoT service usually consists of three parts:
- Bluemix IoT service configuration (device and application registration)
- Device-side programming
- Application-side programming
Step 1. Set up the Bluemix IoT service
Create an app on the dashboard
- Log in to Bluemix using your Bluemix account.
- Click Catalog in the top menu.
- From the Boilerplates section, click Internet of Things Platform Starter.
- In the Name field, specify a unique name of your app. For this tutorial, I’ve used bluemixmqtt.
- Click CREATE. Wait for your application to start.
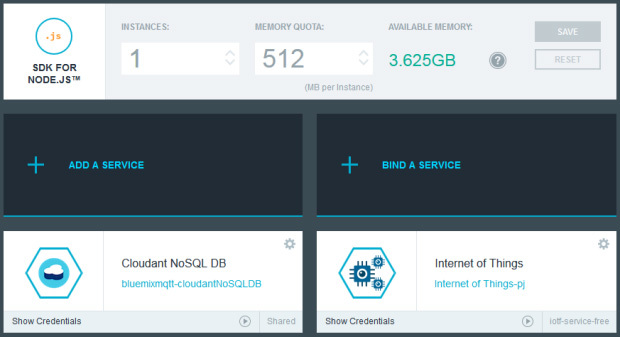
Add the IoT service
- Click ADD A SERVICE.
- Choose Internet of Things service under the Internet of Things section.
- Click CREATE. Click Restage if prompted.
An app with IoT service is now created similar to this:
Launch the IoT service console
- Navigate to your application Overview page, and click Internet of Things.
- Click Launch dashboard to open the IoT service console.
Register the device
- Click Add Device under the Devices tab.
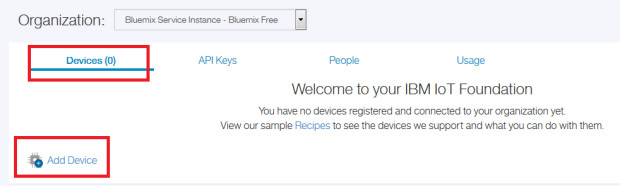
- Choose Create a device type for the Device Type option.
- Fill in the Device Type as MQTTDevice. We will use that value later.
- Fill in the Device ID with a unique id, for example, aabbccddee12. You may input your own identifier.
- Click Continue.

- Copy the information for the device; we will use it later.

- Click Done.
Repeat the steps above to register more devices, if you like.
**Register the application**
- Under the API Keys tab, click New API Key.
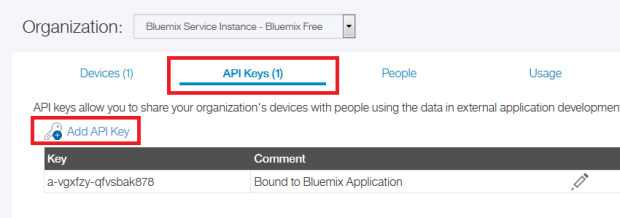
- Copy the information in the New API Key dialog; we will use it later.
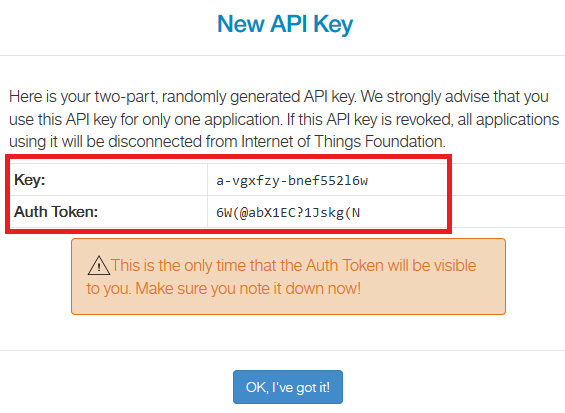
- Click OK.
Repeat the steps above to register more applications, if you like.
Step 2. Create a device-side program
Device-side programming consists of three parts:
- Connecting to the IoT service (MQTT broker)
- Publishing events to applications
- Subscribing commands from applications
In this section, you’ll build a simple device-side program in Java with Eclipse Paho Java. For more information, see the source code.
**Connect to the IoT service**
The access point for the IoT service (MQTT broker) is .messaging.internetofthings.ibmcloud.com, where is created automatically when the IoT service is configured. You may use either TCP or TLS (Transport Layer Security).
tcp://<org-id>.messaging.internetofthings.ibmcloud.com:1883
ssl://<org-id>.messaging.internetofthings.ibmcloud.com:8883
Before connecting to the IoT service as a device client, you must set the MQTT connection options.
- The client-id property should be in the form
d:<orgid>:<type-id>:<divice-id>.
<orgid> is the same as above, while <type-id> and <divice-id> were input previously when the devices were registered.
- The authmethod property should be set to use-token-auth.
- The authtoken property should be set to the auth-token field from the device information that was copied earlier.
The following code snippet is from class com.ibm.bluemixmqtt.MqttHandler.java. You may choose to use TCP or TLS. If you are using TLS, you should set property com.ibm.ssl.protocol to TLSv1.2; otherwise, the connection may fail.
public void connect(String serverHost, String clientId, String authmethod,
String authtoken, boolean isSSL) {
// check if client is already connected
if (!isMqttConnected()) {
String connectionUri = null;
    //tcp://<org-id>.messaging.internetofthings.ibmcloud.com:1883
    //ssl://<org-id>.messaging.internetofthings.ibmcloud.com:8883
    if (isSSL) {
        connectionUri = "ssl://" + serverHost + ":" + DEFAULT_SSL_PORT;
    } else {
        connectionUri = "tcp://" + serverHost + ":" + DEFAULT_TCP_PORT;
    }

    if (client != null) {
        try {
            client.disconnect();
        } catch (MqttException e) {
            e.printStackTrace();
        }
        client = null;
    }

    try {
        client = new MqttClient(connectionUri, clientId);
    } catch (MqttException e) {
        e.printStackTrace();
    }

    client.setCallback(this);

    // create MqttConnectOptions and set the clean session flag
    MqttConnectOptions options = new MqttConnectOptions();
    options.setCleanSession(true);

    options.setUserName(authmethod);
    options.setPassword(authtoken.toCharArray());

    //If SSL is used, do not forget to use TLSv1.2
    if (isSSL) {
        java.util.Properties sslClientProps = new java.util.Properties();
        sslClientProps.setProperty("com.ibm.ssl.protocol", "TLSv1.2");
        options.setSSLProperties(sslClientProps);
    }

    try {
        // connect
        client.connect(options);
        System.out.println("Connected to " + connectionUri);
    } catch (MqttException e) {
        e.printStackTrace();
    }
}
}
The following code snippet is from class com.ibm.bluemixmqtt.DeviceTest.java. This code reads from the configuration file and sets the MQTT connection options with the values from the configuration file in the correct formats.
//Read properties from the conf file
Properties props = MqttUtil.readProperties("device.conf");

String org = props.getProperty("org");
String id = props.getProperty("deviceid");
String authmethod = "use-token-auth";
String authtoken = props.getProperty("token");
//isSSL property
String sslStr = props.getProperty("isSSL");
boolean isSSL = false;
if (sslStr.equals("T")) {
    isSSL = true;
}

System.out.println("org: " + org);
System.out.println("id: " + id);
System.out.println("authmethod: " + authmethod);
System.out.println("authtoken: " + authtoken);
System.out.println("isSSL: " + isSSL);

String serverHost = org + MqttUtil.SERVER_SUFFIX;

//Format: d:<orgid>:<type-id>:<divice-id>
String clientId = "d:" + org + ":" + MqttUtil.DEFAULT_DEVICE_TYPE + ":"
        + id;
handler = new DeviceMqttHandler();
handler.connect(serverHost, clientId, authmethod, authtoken, isSSL);
Note: To connect to the Bluemix IoT service, you must use MQTT at the Version 3.1 level at a minimum; MQTT 3.1.1 is recommended for richer functionality.
## **Publish events**
Event topics should be published in this form: iot-2/evt//fmt/. The is set to categorize different event types; you may choose your own value. The is set to json. The message should be encoded in JSON, and it must contain a single top-level property called "d".
The following code snippet is from class com.ibm.bluemixmqtt.DeviceTest.java. It encodes the message into JSON format and publishes it to the correct topic.
//Format the Json String
JSONObject contObj = new JSONObject();
JSONObject jsonObj = new JSONObject();
try {
    contObj.put("count", count);
    contObj.put("time", new SimpleDateFormat("yyyy-MM-dd HH:mm:ss")
            .format(new Date()));
    jsonObj.put("d", contObj);
} catch (JSONException e1) {
    e1.printStackTrace();
}

System.out.println("Send count as " + count);

//Publish device events to the app
//iot-2/evt/<event-id>/fmt/<format>
handler.publish("iot-2/evt/" + MqttUtil.DEFAULT_EVENT_ID
        + "/fmt/json", jsonObj.toString(), false, 0);
In our sample device program, we publish events with the count value incrementing from 0 every 15 seconds. Below is a sample message. Note that top-level property "d" is required in the event JSON message.
{
    "d": {
        "count": 3,
        "time": "2014-12-30 16:14:59"
    }
}
Subscribe commands
The topic of subscribing commands should be in the form:iot-2/cmd/<cmd-type>/fmt/<format-id>. The <cmd-type> is set to categorize different command types; you may choose your own value. <cmd-type> can be set using the plus symbol ("+") as a wildcard, so that it can subscribe various types of commands. The <format-id> is set to json.
The following code snippet is from class com.ibm.bluemixmqtt.DeviceTest.java. It demonstrates how to subscribe the command message.
   //Subscribe the Command events
//iot-2/cmd/<cmd-type>/fmt/<format-id>
handler.subscribe("iot-2/cmd/" + MqttUtil.DEFAULT_CMD_ID + "/fmt/json",
        0);
Once a command event is received, the callback function messageArrived is executed. The code snippet below is from com.ibm.bluemixmqtt.DeviceTest.java. In our sample application, when the command is received from the application side, the count is reset to the value extracted from the command.
public void messageArrived(String topic, MqttMessage mqttMessage)
        throws Exception {
    super.messageArrived(topic, mqttMessage);

    //Check whether the event is a command event from app
    if (topic.equals("iot-2/cmd/" + MqttUtil.DEFAULT_CMD_ID
            + "/fmt/json")) {
        String payload = new String(mqttMessage.getPayload());
        JSONObject jsonObject = new JSONObject(payload);
        String cmd = jsonObject.getString("cmd");
        //Reset the count
        if (cmd != null && cmd.equals("reset")) {
            int resetcount = jsonObject.getInt("count");
            count = resetcount;
            System.out.println("Count is reset to " + resetcount);
        }
    }
}
Step 3. Create an application-side program
As with device-side programming, application-side programming consists of three parts:
- Connecting to the IoT service (MQTT broker)
- Subscribing events from devices or from the MQTT broker
- Publishing commands to devices
In this section, you’ll build a simple application-side program in Java with Eclipse Paho Java. For more information, see the source code.
Connect to the IoT service
The access point for IoT service is the same as that of the device side, while there are some differences between the MQTT connection option formats:
The client-id property should be in the form a::. is the same as in the device side, and is the unique id set for your application; you may choose your own.
The authmethod and the authtoken property should be set to relevant fields (Key and Auth Token) from the application information copied earlier.
The following code snippet is from class com.ibm.bluemixmqtt.APPTest.java. It reads from the configuration file and sets the MQTT connection properties with the values from the configuration file in the correct formats.
//Read properties from the conf file
Properties props = MqttUtil.readProperties("app.conf");

String org = props.getProperty("org");
String id = props.getProperty("appid");
String authmethod = props.getProperty("key");
String authtoken = props.getProperty("token");
//isSSL property
String sslStr = props.getProperty("isSSL");
boolean isSSL = false;
if (sslStr.equals("T")) {
    isSSL = true;
}

System.out.println("org: " + org);
System.out.println("id: " + id);
System.out.println("authmethod: " + authmethod);
System.out.println("authtoken" + authtoken);
System.out.println("isSSL: " + isSSL);

//Format: a:<orgid>:<app-id>
String clientId = "a:" + org + ":" + id;
String serverHost = org + MqttUtil.SERVER_SUFFIX;

handler = new AppMqttHandler();
handler.connect(serverHost, clientId, authmethod, authtoken, isSSL);
Subscribe events
The application side can subscribe two types of events: (1) status messages from the device side and (2) system-generated connection monitor messages.
-
The topic for subscribing device-side events should be in the form:
iot-2/type/<type-id>/id/<device-id>/evt/<event-id>/fmt/<format-id>. It should be consistent with the event form on the device side. A plus symbol ("+") can be used as a wildcard, which would match exactly one level in the topic tree. -
The topic for subscribing system events should be in this form:
iot-2/type/<type-id>/id/<device-id>/mon. In this case, too, a plus symbol ("+") can be used as a wildcard. By subscribing system events, you can receive the messages every time a device connects or disconnects from the IoT service.
The following code snippet is from class com.ibm.bluemixmqtt.APPTest.java. Both the system and device events are subscribed.
handler.subscribe("iot-2/type/" + MqttUtil.DEFAULT_DEVICE_TYPE
        + "/id/+/mon", 0);

//Subscribe Device Events
//iot-2/type/<type-id>/id/<device-id>/evt/<event-id>/fmt/<format-id>
handler.subscribe("iot-2/type/" + MqttUtil.DEFAULT_DEVICE_TYPE
        + "/id/+/evt/" + MqttUtil.DEFAULT_EVENT_ID + "/fmt/json", 0);
Once an event is received, the callback function messageArrived is executed. In our sample application, we check the count value in the message. If the count value reaches 4, we start a new thread to publish a command to the corresponding device to reset the count value to 0. For more information, see the class com.ibm.bluemixmqtt.APPTest.java file.
public void messageArrived(String topic, MqttMessage mqttMessage)
        throws Exception {
    super.messageArrived(topic, mqttMessage);

    Matcher matcher = pattern.matcher(topic);
    if (matcher.matches()) {
        String deviceid = matcher.group(1);
        String payload = new String(mqttMessage.getPayload());

        //Parse the payload in Json Format
        JSONObject jsonObject = new JSONObject(payload);
        JSONObject contObj = jsonObject.getJSONObject("d");
        int count = contObj.getInt("count");
        System.out.println("Receive count " + count + " from device "
                + deviceid);

        //If count >=4, start a new thread to reset the count
        if (count >= 4) {
            new ResetCountThread(deviceid, 0).start();
        }
    }
}
Publish commands
The topic for publishing commands should be in this form: iot-2/cmd/<cmd-type>/fmt/<format-id>. It should be consistent with the command form on the device side.
The following code snippet is from class com.ibm.bluemixmqtt.APPTest.java. It publishes the reset command to the corresponding device once the count value reaches 4. Of course, the command is encoded into JSON format as well.
JSONObject jsonObj = new JSONObject();
try {
    jsonObj.put("cmd", "reset");
    jsonObj.put("count", count);
    jsonObj.put("time", new SimpleDateFormat("yyyy-MM-dd HH:mm:ss")
            .format(new Date()));
} catch (JSONException e) {
    e.printStackTrace();
}
System.out.println("Reset count for device " + deviceid);

//Publish command to one specific device
//iot-2/type/<type-id>/id/<device-id>/cmd/<cmd-id>/fmt/<format-id>
handler.publish("iot-2/type/" + MqttUtil.DEFAULT_DEVICE_TYPE
        + "/id/" + deviceid + "/cmd/" + MqttUtil.DEFAULT_CMD_ID
        + "/fmt/json", jsonObj.toString(), false, 0);
Step 4. Run the app
Build the project
- Fork the code from the source code.
- Build the project using Eclipse locally and export it as a jar archive, for example, “
bluemixmqtt.jar”. You can find a compiled example and other referenced libraries under the MyData folder, in case you do not want to compile one yourself.
Update the application-side configuration file
The application-side configuration file is at MyData/app.conf. Update it according to the properties you copied while registering the application previously.
#Configuration files for App Side Applications

#The org field is the same org field as the Device side
org=<org>

# A unique id you choose it by yourself, maybe, abcdefg123456
appid=<appid>

# The key field from App Keys info you copied previously
key=<Key>

# The Auth Token field from App Keys info you copied previously
token=<Auth_Token>

#T or F, T means using SSL, while F means not
isSSL=F
Run the application-side program
After the configuration file is updated, open a command line, go to the MyData folder, and execute the following command to run the application-side program:
> java -cp .;org.eclipse.paho.client.mqttv3.jar;json4j-apache-1.1.0.jar;bluemixmqtt.jar com.ibm.bluemixmqtt.AppTest
When the application-side program has been successfully connected to the IoT service, you should receive a confirmation message similar to this:

Update the device-side configuration file
The device-side configuration file is at MyData/device.conf. Update it according to the properties you copied while registering the device previously.
#Configuration files for Device Side Applications

#The org field from Device info you copied previously
org=<org>

#The id field from Device info you copied previously
deviceid=<id>

#The auth-token field from Device info you copied previously
token=<auth-token>

#T or F, T means using SSL, while F means not
isSSL=F
Run the device-side program
After the configuration file is updated, open a command line, go to the MyData folder, and then execute the following command to run the device-side program.
java -cp .;org.eclipse.paho.client.mqttv3.jar;json4j-apache-1.1.0.jar;bluemixmqtt.jar com.ibm.bluemixmqtt.DeviceTest
When the device-side program has been successfully connected to the IoT service, you should receive a confirmation message similar to this:

Check running applications
Device-side programs publish status event messages (with the count value incrementing from 0 every 15 seconds). You can find relevant logs (including event and command messages details) from the command line.
In addition, you can follow the steps below to view the event details on the IoT service console.
- Navigate to the IoT service console.
- On the Devices tab, observe what happens to the relevant devices. In this case, the device id is aabbccddee12.
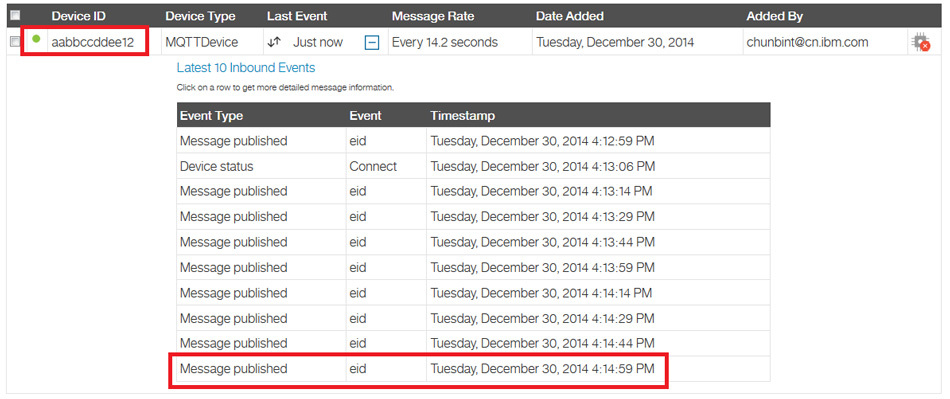
3… Click one event to view the details of the message.
Pay attention to the count field. As mentioned earlier, the value of the count field is incrementing from 0. Once it reaches 4, the application-side program publishes a command to the corresponding device to reset the value to 0. In that way, the count value will always be from 0 to 4, but never outside the domain.
Conclusion
It is both simple and interesting to build applications with the Bluemix Internet of Things (IoT) service. In this tutorial, we explored the MQTT world behind the IoT service and explained how it works. A step-by-step tutorial showed how to build a sample solution using MQTT with either Java or the Node-RED editor. Because the IoT concept can be used in many different scenarios, you can use the sample app as a reference and compose your own solutions using the Bluemix IoT service to help interconnect the whole world.
Credits: IBM Developers