
The Internet of Things (IoT) represents a new ecosystem of devices and applications, which are integrated in innovative ways to deliver smart services. A simple example would be an Internet-enabled coffee machine, or a refrigerator able to take inventory of its own contents. While these examples are popular consumer examples, IoT programming is applicable to a wide variety of industry domains, including business, agriculture, research, healthcare, and more.
In the following sections you will set up your IBM Bluemix workspace, develop the demo application by using Node-RED, and successfully send an SMS from the application to your mobile phone by using Twilio.
If you’re ready to start programming for IoT, this tutorial will get you started by building an IoT app that automatically notifies a remote user if their computer or IT network is down. We’ll use these technologies:
– IBM Bluemix, the IBM cloud offering based on Cloud Foundry, which is an open source Platform as a Service
– Node-RED, an open source technology that seems tailor-made for making sense of the Internet of Things
– Twilio, for its SMS messaging capabilities
Steps to create the application:
(Create your Node-RED application in Bluemix)
- Log in to your Bluemix account (or sign up for a free trial). Verify that your dev workspace was created
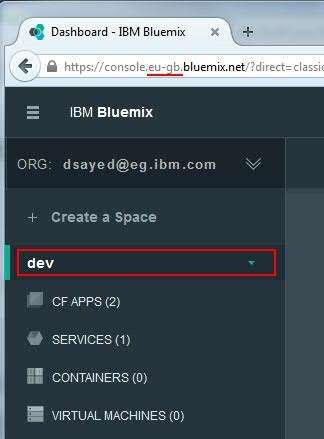
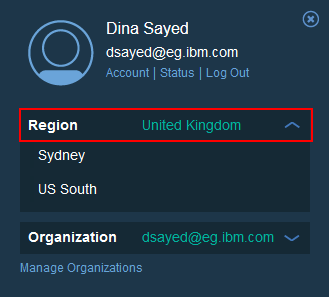
- Open your account profile, and verify that the active region is set correctly. You can deploy your application to any of the existing Bluemix regions. It doesn’t matter which region you choose. I’ll deploy my application to the “Europe United Kingdom” region, but you can deploy yours to one of the other two. For example, if you prefer the US South region, change the region prefix in your profile in the application settings.
-
In the catalog, search for and select the Node-RED Starter service.
-
Enter a unique name for your application, which automatically specifies its host name, then click Create.
Create a two-node application
-
Open the URL link for your Bluemix application, and click “Go to your Node-RED flow editor.” In the flow editor, you will see a blank sheet in the center of the screen and many nodes available in the palette on the left.
-
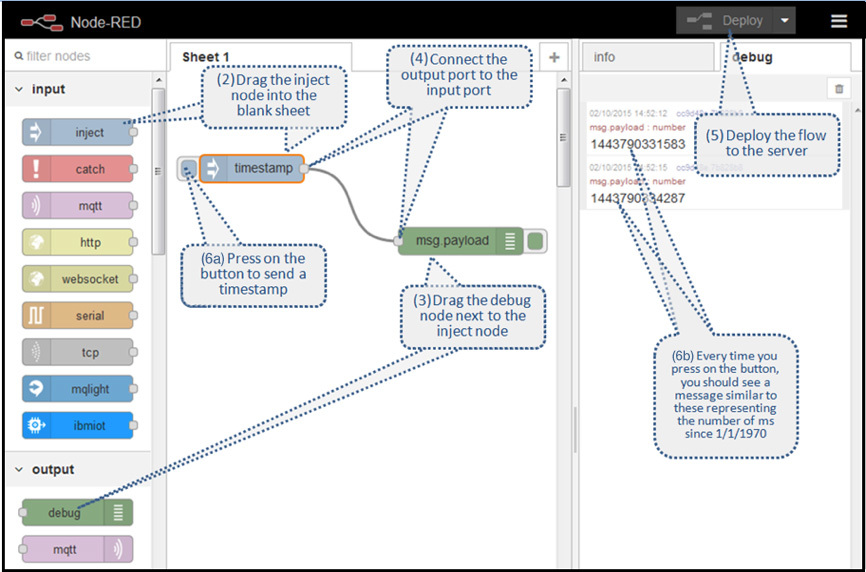
Find the Inject node in the palette, under the Input section. Drag it into the blank sheet. This node has a button that will send a time stamp of the current time to the connected nodes.
-
Find the Debug node in the palette, under the Output section. Drag it next to the Inject node. This node allows you to see incoming messages in the application’s Debug tab.
-
Connect the output port of the Inject node to the input port of the Debug node. The Inject node’s time stamp messages are directed to the Debug node. The Debug node will then display msg.payload (the time stamp) in the Debug tab. (Connect the two nodes by clicking and holding the gray square on the right side of the Inject node and dragging it to the gray square on the left side of the Debug node.)
-
Deploy the Node-RED flow by pressing the Deploy button at the upper-right corner of the page.
-
Press the button on the left side of the Inject node.
The time stamp of your clicks is displayed in the Debug tab, as shown in Figure 1:
How to add a customized node to your palette?
You can add a custom node by editing a JSON file named package.json.
-
Return to the Bluemix dashboard.
-
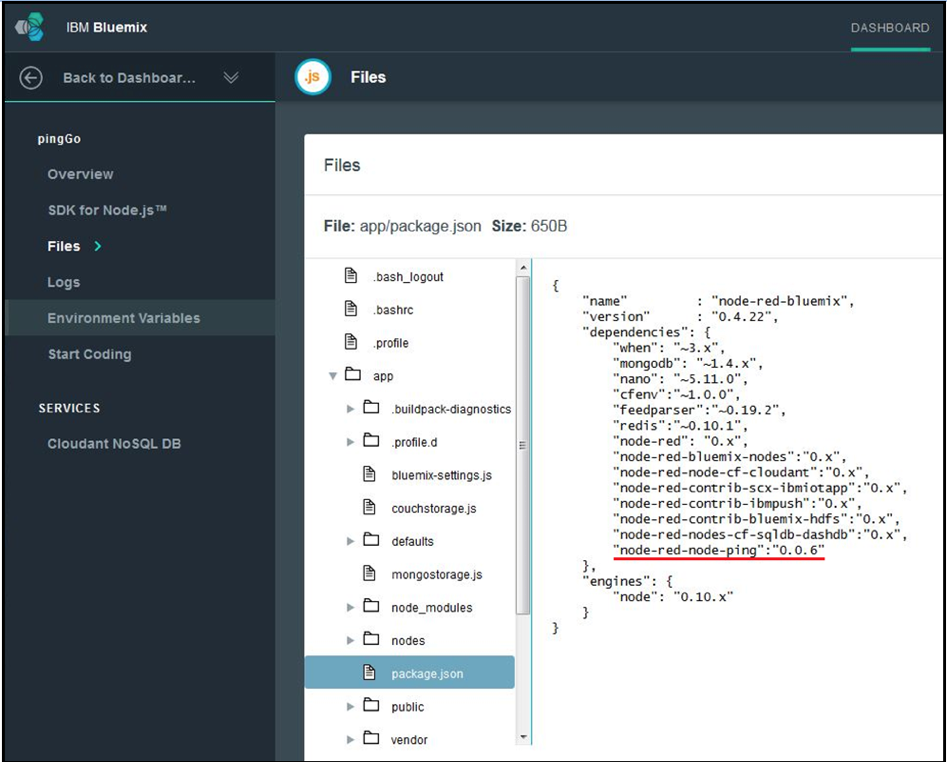
In the left navigation pane, open the Files page.
-
Go to the app/package.json file.
You will see a file similar to the following file:
{
    "name"         : "node-red-bluemix",
    "version"      : "0.4.22",
    "dependencies": {
        "when": "~3.x",
        "mongodb": "~1.4.x",
        "nano": "~5.11.0",
        "cfenv":"~1.0.0",
        "feedparser":"~0.19.2",
        "redis":"~0.10.1",
        "node-red": "0.x",
        "node-red-bluemix-nodes":"0.x",
        "node-red-node-cf-cloudant":"0.x",
        "node-red-contrib-scx-ibmiotapp":"0.x",
        "node-red-contrib-ibmpush":"0.x",
        "node-red-contrib-bluemix-hdfs":"0.x",
        "node-red-nodes-cf-sqldb-dashdb":"0.x"
    },
    "engines": {
        "node": "0.10.x"
    }
}
- Update the application files. You need to edit the app/package.json file and append
node-red-node-ping":"0.0.6to the required packages list in the dependencies section of the file.
-
You have two options for how to update the application files. You can download the application, edit the files locally, then push your changes back to Bluemix, or you can use IBM DevOps Services to edit and deploy your changes directly from your web browser.
-
To download and edit the application files locally, follow the instructions from the Start Coding page in your Bluemix dashboard. This page has instructions for deploying your app by using the Cloud Foundry command-line interface.
-
To use IBM DevOps Services, follow the instructions in this tutorial. You’ll be guided through the steps to set up a Git integration, push your changes, and deploy them to your workspace.
However you choose to update package.json, the new file should look like this file:
- Return to the flow editor.
- Refresh the flow editor. The new Ping node is added to the bottom of your palette:
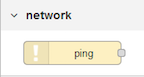
How to add the Ping node to your flow?
-
In the flow editor, drag the Ping node onto the sheet.
-
Double-click the node to edit its configurations. Write the IP address of a machine that you want to monitor in the Target field. Write a brief, descriptive name for the node, such as “ping myServer.” Then, click OK.
-
Observe the output of the Ping node by connecting a Debug node to its output.

-
Deploy your node-RED application with the nodes you have defined so far. The debug messages are displayed in the Debug tab in the right pane.
Check ping replies
In the case of a successful ping, the Ping node returns the trip time in the msg.payload property. If there is no server response within 5 seconds, the node returns false. You can set up a Function node to check the msg.payload value.
- Find the Function section in your palette, and drag a Function node beside the Ping node in the sheet.
- Connect the output of the Ping node to the input of the Function node.
- Double-click the node to edit it. In the Name field type: isAlive?.
- In the function block add the following code:
Listing 2. Edit the Function node’s code
msg.tripTime = msg.payload;
msg.payload = msg.payload !== false ?
 "Your server is running":
  "Your server is down";
 return msg;
- Click OK to exit the edit dialog.
The Function node will create a string that includes either “Your server is running”, if it receives a reply within 5 seconds, or “Your server is down”, if your server is unreachable.
Because you probably don’t want to receive a new SMS every 20 seconds, add a node to handle exceptions to your application flow.
- Drag the “Report by Exception” node to the sheet.
- Double-click the node, and select block unless value changes.
- Now, no message will pass unless it has a different msg.payload from the previous one.
- In the Name field for this node, type send once.
- Click OK.
How to send an SMS alert with Twilio?
- Gather your Twilio number and credentials from the Twilio account that you created:
- Open the Twilio messaging page.
- Press Get your first Twilio Number. Take note of this SMS sender phone number; you might want to copy it into a text file.
- Press Choose this Number.
- On the Twilio messaging page, find and click the small link called Show API Credentials. Take note of your account SID and the authentication token; you might want to copy it into a text file.
-
Return to the flow editor.
-
Find the Twilio node under the Output section of the palette, and drag it to your sheet.
-
Double-click the Twilio node to configure its settings:
- In the Service field, select “External Service.”
- Press the small edit icon to open the “Add new twilio-api config node” dialog.
- In this dialog, provide the account SID, SMS sender phone number, and the authentication token that you copied from the Twilio messaging page.
- Click Add to return to the Edit dialog.
- In the SMS to field, enter your mobile number (the mobile number for your SMS receiver).
- In the Name field, type SMS alert to admin and click OK.
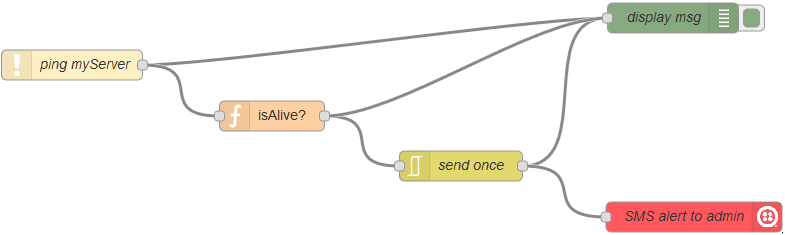
- Click Deploy in your flow editor.
Figure 2. The final application flow
Deploy your Node-RED application
- In your flow editor, click Deploy.
Conclusion
In this tutorial, you learned just how easy it is to create an IoT app with Node-RED, Bluemix, and Twilio. You used both standard and custom nodes and configured those connected nodes in your application flow. You deployed your application by using your own mobile phone as the SMS receiver of the alerts.
Credits: IBM Developers