
Table of Contents
- What are AWS instances?
- How to configure an instance?
- How to build your first model on an AWS instance?
1. What are AWS Instances?
Amazon EC2 (Elastic Compute Cloud) instances provide access to scale able computing resources on the cloud. This allow organizations and individuals to stay away from setting up and maintaining hardware on site. You can use it just like your own laptop but get your dream configuration for a cheaper bargain with the option of varying it as you need in a pay-per-use setting. Amazon EC2 allows you to manage your security, networking and storage as desired.
Before moving forward, lets try and understand some of the terminologies used by AWS. This will make it easier for to use the interface and the platform.
1.1 Instances and AMIs
As described by AWS, An AMI (Amazon Machine Image) is a template that contains a software configuration (for example, an operating system, an application server, and applications). You can understand it as a high level definition of your system. Different AMIs can be understood as different categories of systems.
For instance, Windows OS vs Linux OS. But this is high level definition and not sufficient to completely define the hardware. So, we go to the next level and define an instance which is just a copy of an AMI but with granular details specified which are required for a system, such as the RAM, memory storage, number of cores, etc.
You can run many instances of same or different types of AMIs. The limit typically depends on your price-plan which can be configured on individual basis. You can find more details here.
Also, some AMIs are predefined by AWS but you can also define your custom AMI. For instance, if you have a website then you can define your own AMI containing your website code and static content so that it is easy to faster working on a new instance. Some AWS developers have also developed some custom AMIs which can be purchased from AWS stores.
1.2 Regions and Availability Zones
Amazon data centers are location globally at multiple locations. A region refers to a geographically separated location while availability zones are isolated locations within a region. You can choose to place your resources across multiple availability zones as well as regions. If a particular location is affected by a failure, all other locations will still continue to run normally.
The infrastructure of AWS can be observed on the following map given by AWS:

Some points to note:
- AWS does not provide any data transfer between regions. So that part has to be managed using your own security protocols over public internet
- Even if we place instances over multiple availability zones and one of them fails, then we can define Elastic IP addresses
- Availability zones are represented by a region code followed by a letter identifier, for instance “us-west-1a”. But these identifiers are defined for one account and cannot be compared across accounts.
1.3 Instance Types
The instance type determines the hardware of the host computer used for the instance. Each instance type offers different compute, memory, and storage capabilities and are grouped in instance families based on these capabilities.
Typically, some part of the host computer’s resources are dedicated for an instance but in case of under-utilized resources, the same can be given to other instances. So the resources vary between a range for a given type of instance.
Instances are either current generation instances or previous generation instances. The new users should always use current generation as the previous generation instances are for those who already have their applications optimized on them and shifting to a new generation instance is time consuming.
AWS provides a plethora of instances for different use cases. You can find a full list here. I will not go into each one of them. But here I will discuss some concepts/AWS terminologies which are important to understand some of the features of those instances.
1.3.1 ECU (EC2 Compute Unit)
Since AWS servers are based on a variety of hardware, its very difficult to provide a performance comparison in absolute terms. To overcome this challenge, AWS has coined an ECU as a hardware benchmark. 1 ECU is the equivalent CPU capacity of a 1.0-1.2 GHz 2007 Opteron or 2007 Xeon processor. So now we can easily compare the performance of a 10ECU instance vs say an 88ECU instance.
1.3.2 Burstable Performance Instances
In such an instance, a minimum level of computing power is predefined but it can have a boost depending upon the idle time and usage. These instances earn credits when they are idle and use them when they go active. The number of credits earned depends on the size of instance.
These are designed for applications such as web servers, developer environments and small databases which don’t need consistently high levels of CPU, but benefit significantly from having full access to very fast CPUs when they need them.
1.3.3 Amazon EBS (Elastic Block Store)
In AWS, memory is available in two forms. First is the instance store, which is an momenta storage, i.e. it is temporary and all data in it gets deleted as the instance is stopped. But this storage is right on the instance and data transfer is very fast.
Another form is Amazon EBS which is a like an external hard-disk attached to the system. Any data available on this remains there even when the instance is not under operation. But since this is like an external device, the data transfer rate will be slow as multiple devices will be using space on the same hardware.
The speed will this vary depending on the load. To overcome this challenge, AWS offers an option called as EBS Optimized. This allows a dedicated bandwidth between AWS server and the data storage device. It might come complimentary with the instance or can be purchased for an additional fee.
1.3.4 Dedicated Instances
These are instances which are dedicated at the server hardware level. Typically, a server will be used to run multiple instances belonging to various customers. But if a customer demands a dedicated server which will only run instances for that particular account, dedicated instances are an option.
2.How to Configure and Launch an Instance?
Now, lets setup and launch an instance using the knowledge we’ve gained till now. For the purpose of this demo, I will use the instance which is available for free so that you can also try it out with no cost involved. However, for specific applications, you will have to use an instance depending on the computing requirements.
In order to get your first instance ready, please follow the given steps:
Step 0: Login to Your AWS Account
Obviously, first we need an AWS account and we need to log into that. AWS offers some free instances for the first which we are going to leverage in this tutorial. After logging into your account, your management console should look like this:
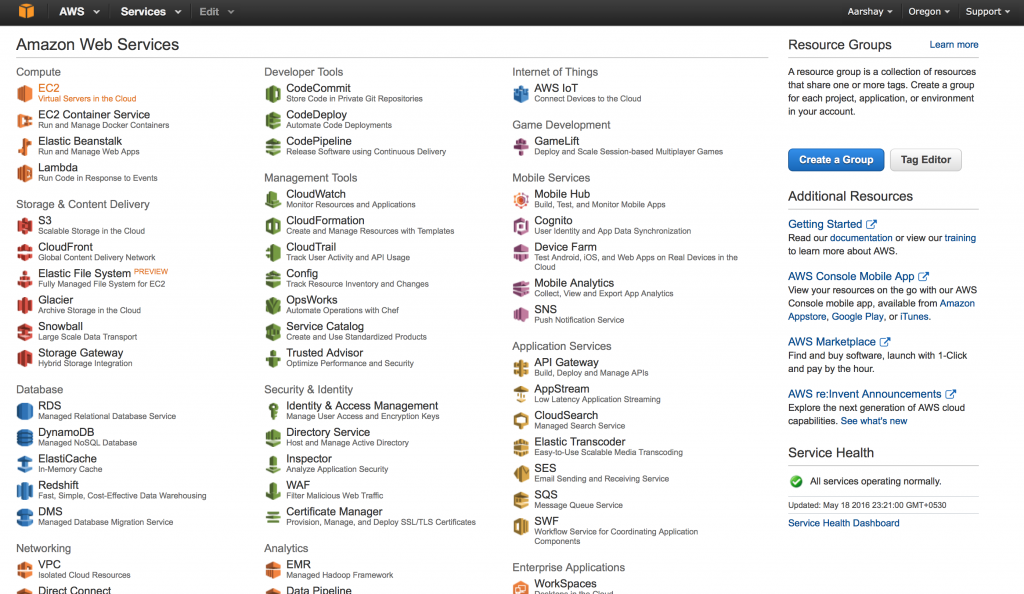
On this page, you should select the “EC2” option which I’ve highlighted in orange on top-left side. This will take you to the EC2 Dashboard which looks like:
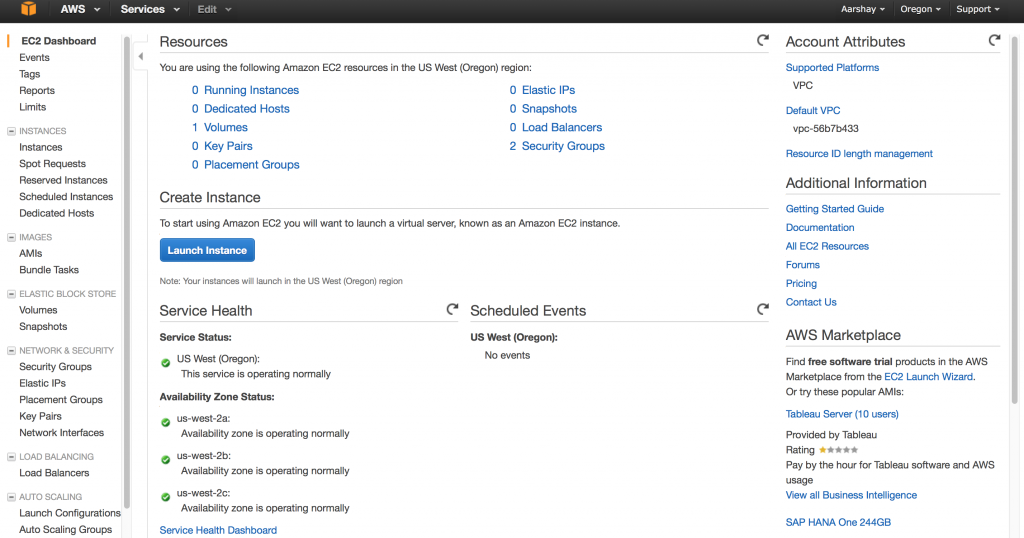
This is the console where you can manage your instances. This gives a snapshot of your account. Since we’re making our first instance, lets directly click the big blue button in the center – Launch Instance. This will start the process of launching a new instance.
Step 1: Choose an Amazon Machine Image (AMI)
Now we have to select our AMI. The Launch Instance button will take us to the following screen:
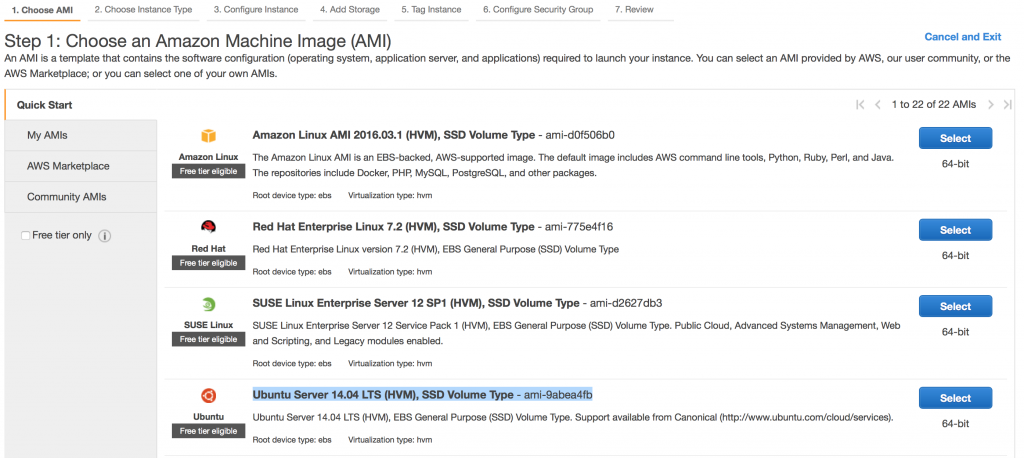
You can see various options here:
Quick Start: These are AWS defined default AMIs which we can choose
My AMIs: Custom AMIs created in the account
AWS MarketPlace: Third-party AMIs pre-configured for running some specific softwares
Community AMIs: Specific purpose AMIs created by AWS developers
Right now, we’ll just use one of the Quick Start AMIs. Lets take an Ubuntu Server 14.04 AMI as selected by me in the image above. You should explore other options as well whenever you get a chance.
Note that this page shows only 4 AMIs but there are many more as you scroll down. You should be cautious of the “Free Tier Eligible” tag. Only AMIs having this tag will fall under the free resources available in the first year.
Lets select the Ubuntu Server and move ahead.
Step 2: Choose an Instance Type
In this step, we have to choose an instance which will be based on the AMI selected above. The page looks like:
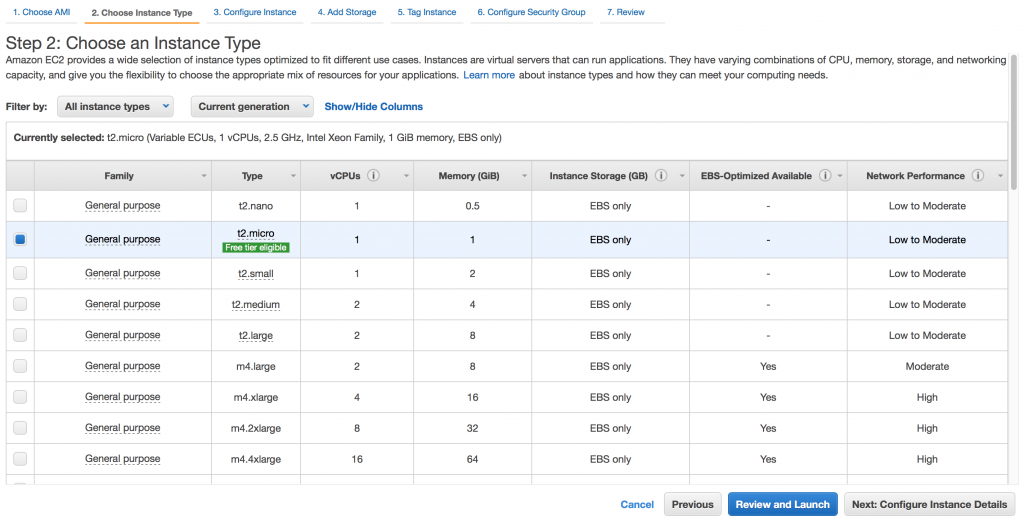
Here you can see 2 filter options on the top:
All Instance Type: Here you can filter out and select one of the broad instance types as described here.
Current Generation: This option can be modified to get previous generation instances as well
Here we’ll simply select t2.micro instance because it is the only one with Free tier eligible.
Step 3: Configure Instance Details
The interface looks like:
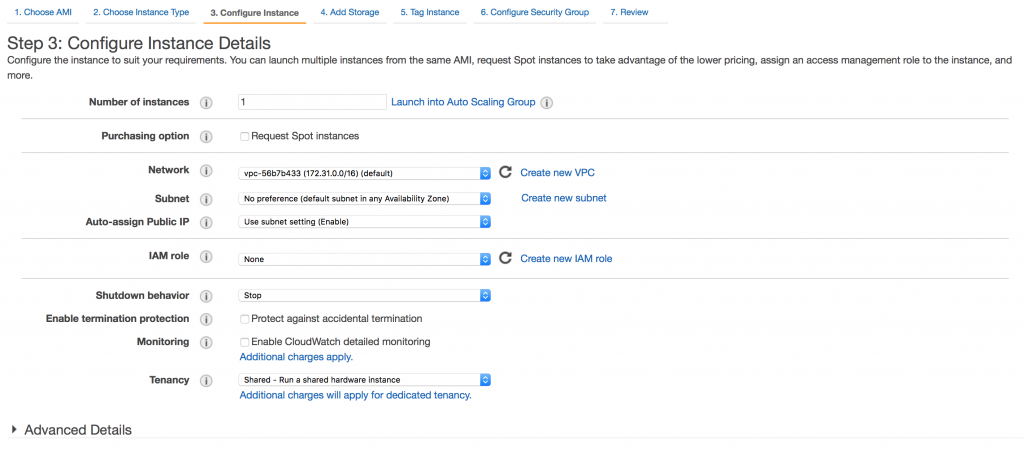
This page allows various settings like:
Purchasing option: select between a regular or a spot instance
Tenancy: select if a dedicated instance is required
Step 4: Add Storage
Now we can configure the memory settings of the instance. The page looks like:
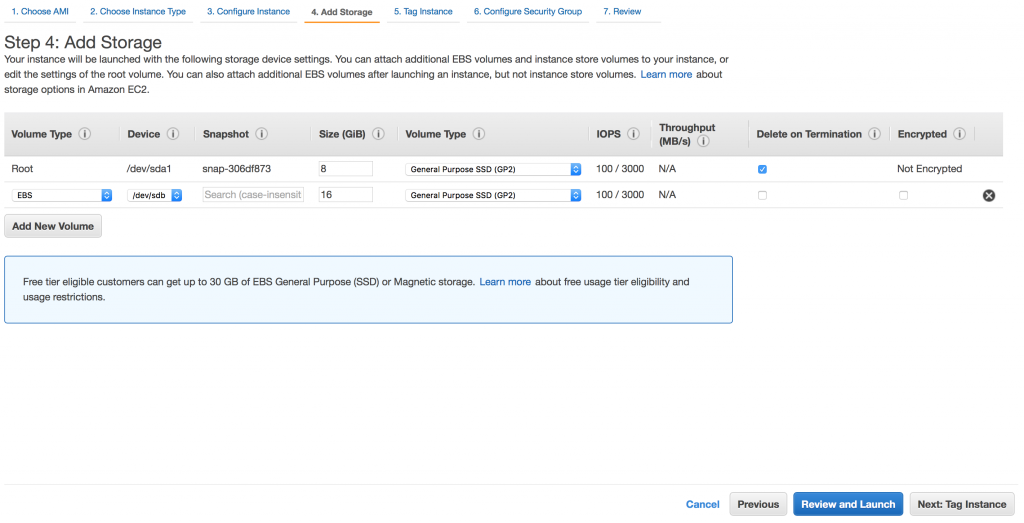
As you can see, by default an 8GB root memory is available. As the page specifies, we can add upto 30GB of general purpose EBS as part of the free tier. So I’ve added another 16GB memory here.
Note that we will skip the next 2 steps in this basic tutorial. You can review and fill some values as per your application. Lets click on Review and Launch to go to the last step.
Step 5: Final Launch
This step shows you a summary of the selections made before you launch. For us, the page would look like:
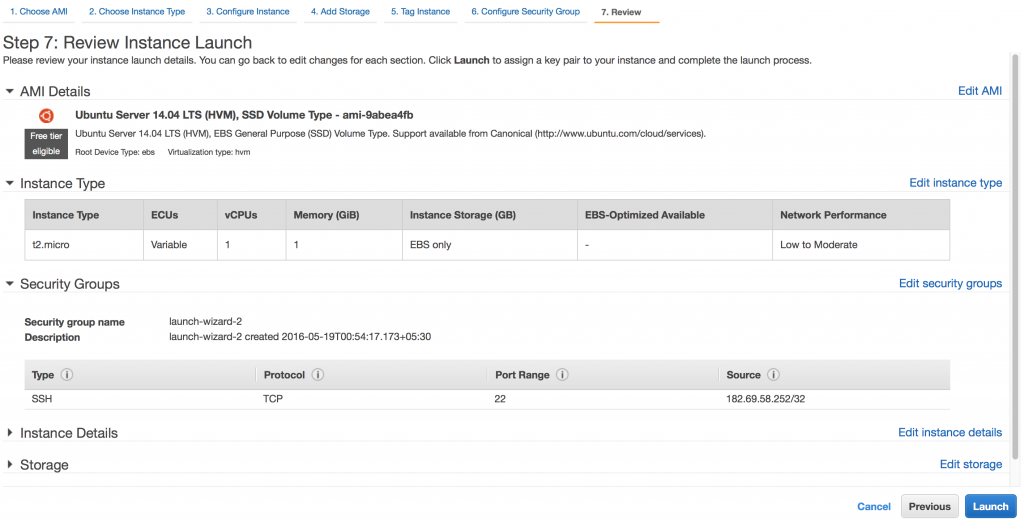
You can check the selections and launch the instance. While launching, AWS will pop up for a key-value pair. This is nothing but a security measure. Instead of remembering the AMI password for launching the instance each time, we can create a key-paid which we can download on our local as a .pem file. This can be used in place of the password always. It can be created as:
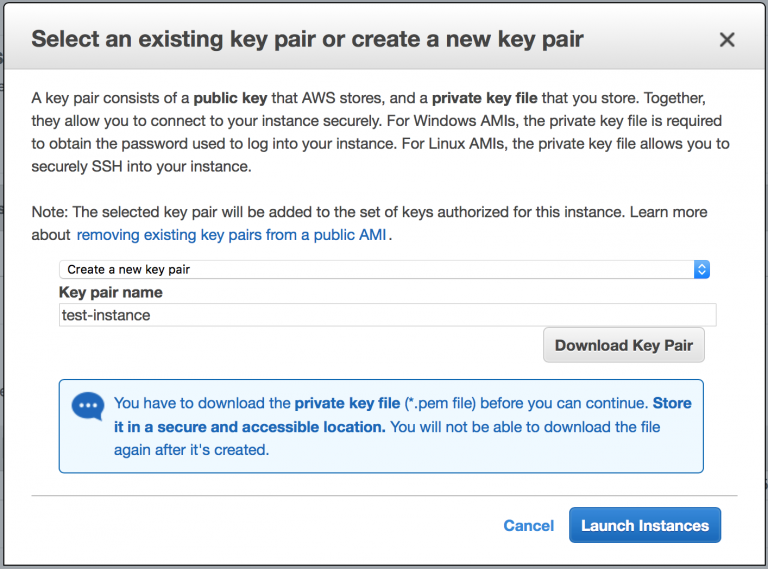
Just select “Create a new key pair”, then type a name and download the .pem file and store in a known location. This will be used to access the instance.
Now that the instance is launched, it will redirect us to the EC2 Dashboard where we can check the instances running. For me, this looks like:
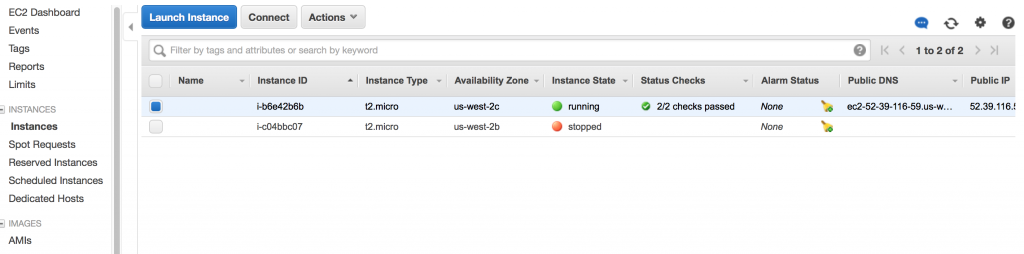
Here you can see 2 instances but the top one is the one we’ve created just now. Note that instance takes some time to get configured. The Status Checks columns shows Initializing… as a comment while the instance is being launched. Now that we can see all checks passed, lets click Connect which will allow us to start talking (I mean in code language :P) to our instance.
You’ll get the following pop-up:
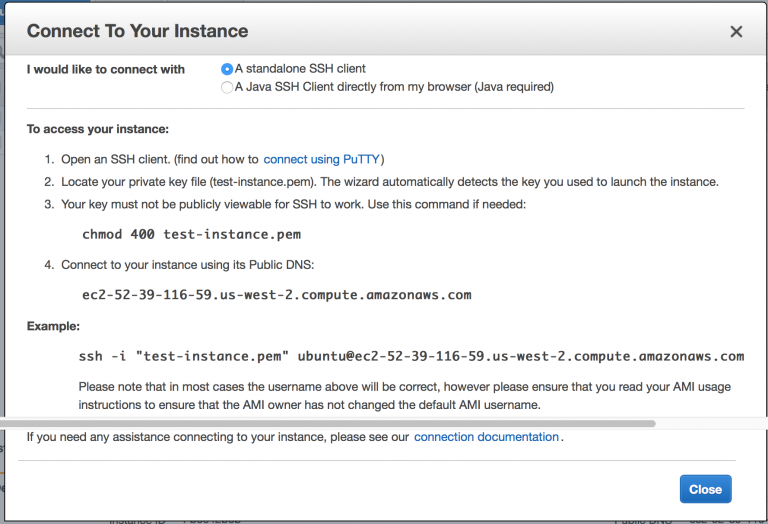
This shows 2 options to connect to the instance. First is to use a standalone SSH client like Putty. Second is to use the browser directly. Since I have a Mac OS X system, I can simple use my terminal to connect using ssh. If you are using windows, you can install Putty or use the second option.
Now our instance is up and running. Now lets run some Python code on that instance.
3. How to make a first model on an AWS instance?
First, I’ll take you through the steps I followed to connect to the instance using my Mac terminal.
- Choose the folder containing the downloaded .pem file as the current directory
- Run the command on step #3 of the connection page above – chmod 400 test-instance.pem
- Run the command on step #4 of the connection page above – ssh -i “test-instance.pem” ubuntu@ec2-52-39-116-59.us-west-2.compute.amazonaws.com
Now we’ll go into the terminal of the ubuntu instance. A snapshot of my terminal with all the above steps is as following:
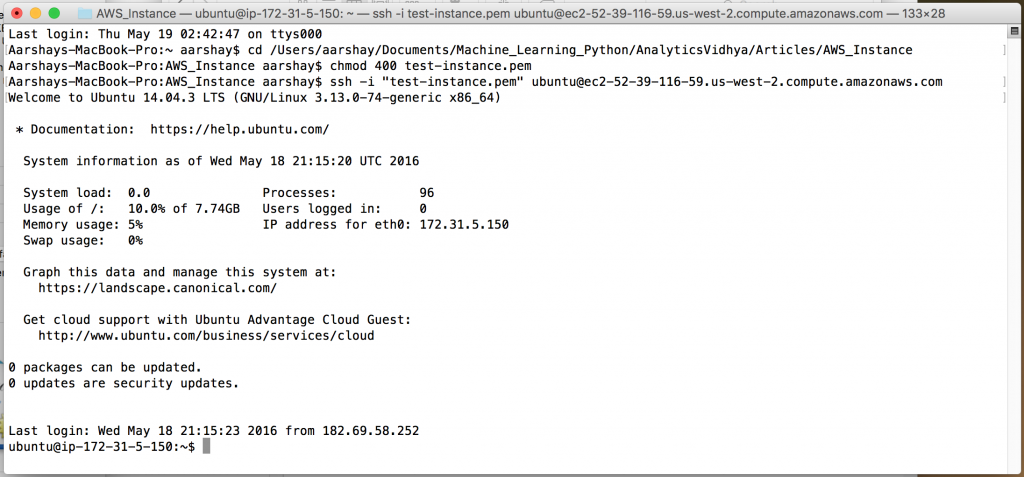
You can see that in the end, we get into the AWS instance and can access its terminal. Now we can easily run some python codes in it.
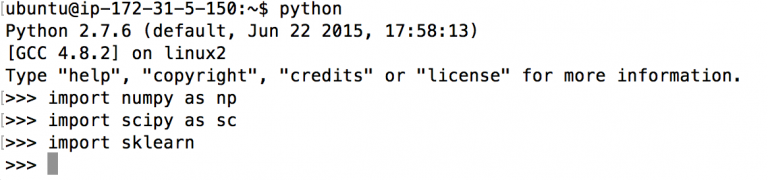
Lets start by getting into python using the command – python as shown:

Remember that this is like a brand new system so we have to install everything from scratch. Lets start by installing pip which can be used to install other packages. This can be done using the command:
#Install setuptools:
wget https://bootstrap.pypa.io/ez_setup.py -O - | python - --user
sudo python setup.py install
#Install pip:
wget http://pypi.python.org/packages/source/p/pip/pip-1.1.tar.gz#md5=62a9f08dd5dc69d76734568a6c040508
tar -xvf pip*.gz
cd pip*
sudo apt-get install python-pip
These codes will successfully install pip. Now we can install numpy, scipy and sklearn using the following commands:
    pip install numpy

    pip install scipy

    pip install sklearn
These commands will install the respective libraries. If you get permission denied issues, you can add sudo (super used do) in front of these which should solve the issue. Note that here I’m just doing this for demonstration so this works. But in practice, you might want to create some virtual environment where your code goes so that it doesn’t affect the other code.
Lets enter into python now and import these libraries to be sure that they are installed.
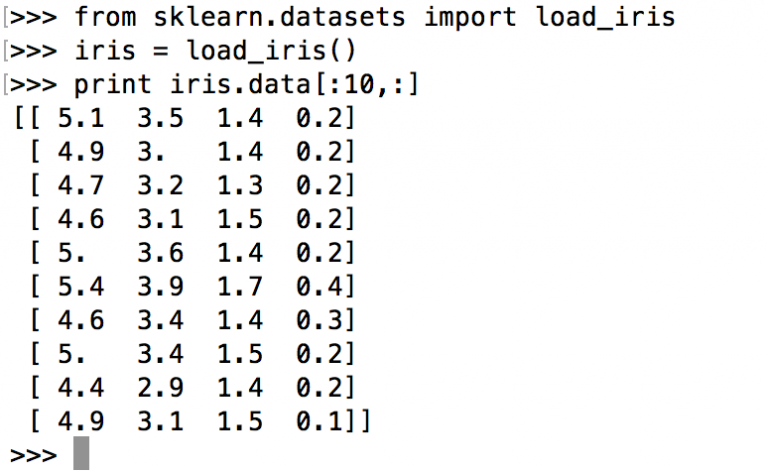
Now lets load the iris dataset as present in sklearn and make a decision tree classifier on it.
from sklearn.datasets import load_iris
iris = load_iris()
print iris.data[:10,:]
Now we can make a quick decision tree on it and analyze the cross validation score.
from sklearn.cross_validation import cross_val_score
alg = DecisionTreeClassifier(random_state=0)
cross_val_score(clf, iris.data, iris.target, cv=10)
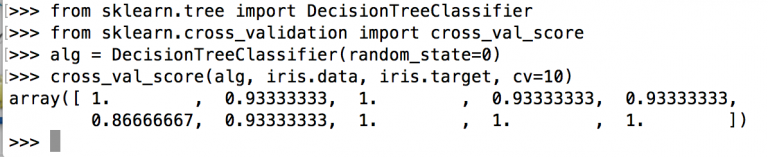
So we have successfully created our first model on an AWS instance and that too for free! I will give this tutorial a halt at this point. Remember that you should stop your instance when not in use else AWS will keep on charging you. Stay tuned for another article where I will take a more detailed practical application with lots of data and train some big models using AWS instances.
End Notes
In this article, we began by getting acquainted to the concepts and terminologies required for understanding the AWS system. Then we moved on to setting up our own AWS instance for free! The journey was clearly laid out with screenshots of the entire process.
Finally, we installed the basic python libraries including numpy and sklearn and made our first model on the IRIS dataset. This was a very high level introduction to AWS but I’ve tried to stick to the fundamentals.
If you follow this article, I’m sure you’ll get a feel of the system which will help you in hardcore practical applications in future.